It’s Jou Life has moved // New site address: itsjoulife.com

It’s Jou Life has moved! New site address:

http://www.itsjoulife.com

It’s Jou Life | a DIY / lifestyle blog—musing about natural, healthy, artisanal living, and everything in between.

Go to our new site and join our mailing list by entering your email (top right column section) and receive an email each time we post!

New It's Jou Life site // https://itsjoulife.com/

Go to our newly remodeled site // itsjoulife.com


Friends of Ours.

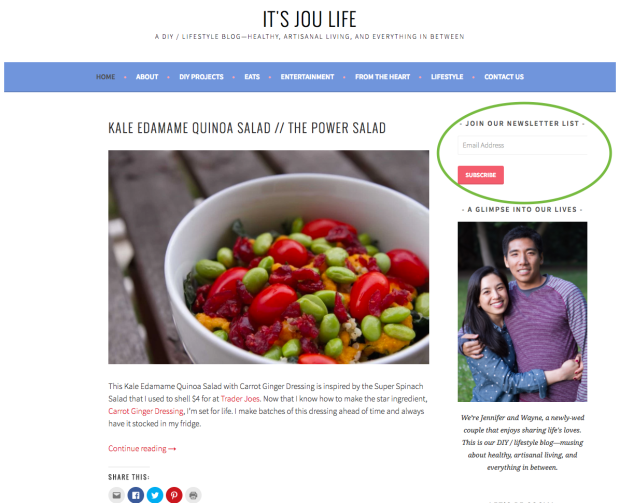
Hello, and welcome to It’s Jou Life! We’re Wayne and Jennifer, a (relatively) newly wed couple who found love in the most unexpecting place. This is our DIY / lifestyle blog—musing about natural, healthy, artisanal living, and everything in between.

We started this blog because our family and friends always ask us how we grow our own organic vegetables, what is Wayne woodworking on now, to send over our miso black cod recipe, what snacks stock our pantry, a tutorial on that cute zippered pouch, tips for marathon running, where do we worship, what to bring for a camping trip, what’s Jennifer’s skincare regimen… you get the idea. This is our way to share life’s loves.

Wayne of all trades is an engineer by day and a woodworker/gardener/chef by night. Jennifer is an activist, artist, actress, and an alliterations addict. You would often find us dancing to our own beat, exploring the great outdoors, at home watching Netflix, and hand crafting everything we own. We find the beauty in our every day, with each other, and in the Lord our Savior.

We both live to create with purpose and hopes to inspire. Thank you for joining us as we try to do all things with love. Here is a glimpse into our quirky lives.

//

We’ve refreshed and re-launched our It’s Jou Life blog to streamline and create more content that is relevant in our lives.

It’s Jou Life has moved! New site address:

http://www.itsjoulife.com

Day 7 // Easy DIY Honey Egg White Yogurt Cucumber Face Mask

Day 7 is my own home recipe // Honey Egg-White Yogurt Cucumber Face Mask. It’s a change from the scheduled Wine-Infused Face Mask, but I didn’t have red wine and wanted to work in a moisturizing and soothing face mask instead. Growing up my mom taught me how to take care and pamper my skin with DIY natural ingredients found in the kitchen pantry. My favorite is the Honey Egg White Yogurt Cucumber Face Mask.

This DIY mask recipe has major benefits that will aid parched skin and fight against the environmental harm that inevitably affects the skin.

  • Honey can aid in the relief of irritated skin because of its mild antiseptic and antibacterial properties.
  • Egg whites contains many proteins, high in collagen, maintain the elasticity of skin and reduce the appearance of fine lines. (Remember to mix the egg white well enough to obtain a foamy egg white look).
  • Yogurt can help moisturize and contains lactic acid that will smooth and gently exfoliate your skin while reducing fine lines and wrinkles by tightening the pores.
  • Cucumbers aid and sooth sunburn, hydrate the eye area and cleanse the skin.

Ingredients

1 egg white

1 tsp honey

1 tsp fresh plain organic yogurt

8  thinly-sliced cucumbers *optional

Directions

  1. Beat the egg white with a fork until it turns a little frothy. Tip: Coolest way to separate the yolk from the egg whites.
  2. In a bowl thoroughly combine the egg white, honey and yogurt.
  3. Apply the mask on your cleansed face and leave it for 15 minutes until you feel it dry.
  4. Gently rinse it off with warm water.

Click here if you prefer to try the Birchbox Challenge Wine-Infused Face Mask instead.

About the Birchbox Challenge

Birchbox teamed up with a panel of all-star experts to bring a 31-day challenge to make 2015 your healthiest, happiest, most gorgeous year ever. I’m joining Birchbox on this month-long challenge and will share my success with #BirchboxChallenge. Make sure to also enter for their daily prize giveaways. Let’s do this together!

{ diy } succulent wedding centerpiece

DIY succulent centerpiece via it's jou life blog http://wp.me/p3cljj-bHWhat do you get when you mix an urban gardener with an DIY-enthusiast? DIY succulent terrarium centerpieces! We spent an hour of our Sunday to create a few of these lovely centerpieces for our upcoming wedding. We’re still having our florist make some floral centerpieces, but felt creating these additional DIY centerpieces is a beautiful way to add a personal touch and share our love for succulents with our guests. (It’s also friendly to our wedding budget!) I’ve learned floral centerpieces can cost from $75-$200. Materials to create these DIY succulent centerpieces cost about $15-$20 each.

A succulent terrarium isn’t only for weddings, it can also add the finishing touch to a coffee table, low-maintenance greenery to a desk or even a unique housewarming gift!

The Usual Suspects:
– Glass container with wide opening
– Succulents, assorted
– Cactus & Succulent soil mix
– Horticultural charcoal (optional)
– Decorative pebbles or river rocks
– A spoon, or little shovel

1. Place a 1-inch layer of pebbles/river rocks on the bottom of container; this provides drainage so the plants won’t rot in standing water. We used a mixture of large-size and small-size river rocks. We bought our glass containers from Michael’s craft store and succulents from our local garden nursery.

2. (Optional) Add a 1/2-inch of horticultural charcoal. The charcoal will help keep the terrarium smelling fresh. Smooth out this layer too. We read it helps to rinse the charcoal before to prevent a layer of black dust from collecting on the inside of the vase.

3. Place a layer of cactus mix soil, a fast-draining soil that retains little moisture. Use your little shovel or hand to level the cactus mix soil in your glass container.

4. Remove plants from pots. If you have multiple succulents in one pot, gently break them apart and use them separately. Scoop a little hole in the soil and place roots in soil. Gently add more soil around the edges of the container and around the base of the plants and pat around the roots. Sometimes the lanky, tall succulents have a difficult time standing up and tend to topple over. Pack more soil around them and strategically place some large-size river rocks around the base to create some stability. We used around 3-5 succulents per centerpiece.

5. Finish the look by adding more river rocks on the top layer. Done!

DIY succulent centerpiece via it's jou life blog http://wp.me/p3cljj-bHDIY succulent centerpiece via it's jou life blog http://wp.me/p3cljj-bHDIY succulent centerpiece via it's jou life blog http://wp.me/p3cljj-bH

DIY succulent centerpiece via it's jou life blog http://wp.me/p3cljj-bHDIY succulent centerpiece via it's jou life blog http://wp.me/p3cljj-bH

DIY succulent centerpiece via it's jou life blog http://wp.me/p3cljj-bHDIY succulent centerpiece via it's jou life blog http://wp.me/p3cljj-bHDIY succulent centerpiece via it's jou life blog http://wp.me/p3cljj-bH

DIY succulent centerpiece via it's jou life blog http://wp.me/p3cljj-bH

Care Tips:
1. Give the terrarium direct sunlight every day for at least five or six hours.
2. Water the terrarium every two weeks. Water lightly–don’t over water.
3. The water should lightly drain to the bottom. After watering, there should not be more than an inch of water visible in the gravel at the bottom.
4. Use your finger to touch the soil and check if it’s dry before watering.

We still have to make more and look forward to shopping for more succulent varieties at our local nurseries!

{ DIY } craft letters for engagement shoot

We had a craft attack last week. In preparation for our e-shoot we prepared decorative craft letters as props. We bought the paper mache craft alphabet letters from Paper Source. They sell the whole alphabet in capital and lower case letters (also ampersand)! They are lightweight and the perfect paper material to be creative. You can decorate with paint, glitter, paper–possibilities are endless!

diy craft letters via it's jou life blog http://wp.me/p3cljj-b7

Materials needed:

– Paper Mache Craft Alphabet Letters: We bought ours from Paper Source.

– Pattered Paper: We bought a beautiful patterned sheet of paper from Paper Source.

– Acrylic Paint: Colors that are similar to the paper you desire to wrap the letters in.

– Foam brushes

– Lead pencil & eraser

– Glue: We used a fabric glue that was strong and quick dry. All-purpose glue should be fine.

– Scissors & a Razor

Total time: If you’re a perfectionist, around 3-4 hours.

diy craft letters via it's jou life blog http://wp.me/p3cljj-b7diy craft letters via it's jou life blog http://wp.me/p3cljj-b7diy craft letters via it's jou life blog http://wp.me/p3cljj-b7The craft letters we bought from Paper Source only come in a natural brown cardboard color. We decided to wrap decorative Paper Source paper around our letters for a unique look. A good tip we read online is to prep the letters with colored paint that is similar colors to the decorate paper. We bought these super cheap Craft Smart Acrylic Paint from Michael’s craft store, along with the foam brushes. Prepping it with paint is a good idea in the case there are “gaps” near the seams. The like-colored paint will be more seamless where the would-be brown gaps are. We painted several coats of yellow, since the color was so light and translucent. No need to soak the foam brush in water, just start painting in full-strength. (Don’t mind the brown empty spots above, my fingers were holding those spots and had to wait until everything dried before completely covering the missing spots)

diy craft letters via it's jou life blog http://wp.me/p3cljj-b7diy craft letters via it's jou life blog http://wp.me/p3cljj-b7This is the tricky part. We lightly traced a dotted line of the letter (with a lead pencil) onto the front decorative side of the paper. We also turned the letter to it’s side and traced the side with a solid line. Then cut at the solid line and folded at the dotted lines. This way, there are “flaps” and that are folded. The flaps should cover the sides of the letter to create a seamless look on the front side. We went back and lightly erased the dotted lines since it was slightly visible. Then glue the paper cut-out to the paper mache. Repeat on the flip side. The inside parts of the “W” had open spots, so strips that were measured to the width of the letter were cut and glued for a seamless effect. For paper that extends off the edges, use a razor to lightly slice it off.

Finished product!

diy craft letters via it's jou life blog http://wp.me/p3cljj-b7

DIY Redwood Planters

We’ve been on the lookout for some medium-large planters to house the new blueberry bushes we got, but its been difficult finding good ones at a reasonable price.  So we decided to build our own.  Total cost ended up being around $25-$30 for a 18inch cube shaped planter.  We could have used cheaper wood and reduced the price a bit, but we decided to use redwood for the weather and insect resistance.

Instead of using redwood planks, we used 5.5 inch redwood fence boards.  Fence boards are cheaper than redwood planks and they also have a more rustic, unfinished look.

Materials List:

Cut from 5.5 inch wide redwood fence boards:

  1. 12×7.25 inches – for the planter sides (A)
  2. 3×18 inches – for the planter bottom (B)

Cut from 5.5 inch wide redwood fence boards, but split length-wise so one piece is 3 1/8 inches and the other is 2 3/8 inches.

  1. 4×17.75 inches – for the planter edges (D: 3 1/8, E: 2 3/8)

Cut from 1 3/8 square redwood lumber

  1. 4×17 inches – for the corner posts (F)

We also used 16 2 1/2 inches exterior wood screws and 12 1 1/4 inch exterior wood screws leftover from a previous project.

Tools List:

  1. Saw (we used a hand saw, but a power mitre saw would be much easier)
  2. Power drill
  3. Carpenters square
  4. Tape measure or ruler
  5. Clamps (we didn’t have any but it would have made the project a lot easier)
  6. Pen

Construction:

After cutting all of the required pieces, check the cut edges to make sure they are smooth and remove any sharp splinters.

Then start by constructing the first corner, take two sides (A) and line them up with corner post (F).  All three pieces should sit on top of a base piece (B) and be flush with the edges.

Redwood Planters Step 1 via it's jou life - http://wp.me/p3cljj-7R
DIY Redwood Planters – Step 1.

Then take the two edging pieces (D and E) and arrange them as shown below (an extra pair of hands might come in handy here).  You can also first screw in the sides to the corner posts, then attach the edging, but we were trying to save some screws.  Be sure to drill pilot holes before driving the screws to make sure the wood doesn’t split.  Pay close attention to how the seams overlap each other.  The seam between the two sides (A) is covered by the edging piece (D).  The side pieces (A) and corner post (F) should sit on top of a base piece (F).  The edge pieces (D and F) should sit on the ground.

Redwood Planters Step 2 via it's jou life - http://wp.me/p3cljj-7R
DIY Redwood Planters – Step 2.

Next, either clamp the pieces of wood together or have a friend hold them while they are screwed together using 2 1/2 inch exterior wood screws.  Make sure you attach the screws in to the center of the corner posts for a solid connection.

boxE via it's jou life - http://wp.me/p3cljj-7R DIY Redwood Planter. Step 3 via it's jou life - http://wp.me/p3cljj-7R
DIY Redwood Planters – Step 3.

After the first corner is done, continue building the corners around the planter.

 DIY Redwood Planter - Step 4 via it's jou life - http://wp.me/p3cljj-7R
DIY Redwood Planters – Step 4.

After all of the corners are completed, slide the remaining sides (A) down the grooves and screw in place.

boxH via it's jou life - http://wp.me/p3cljj-7R
DIY Redwood Planters – Step 5.

The final step is to attach the bottom boards (B).  Lay out the boards so there is around a 1/2 inch gap between the three boards for drainage.  Then screw in to place using a combination of the 1 1/4 inch screws along the edge and the 2 1/2 inch screws in to the corner posts (F).

DIY Redwood Planters - Step 6 via it's jou life - http://wp.me/p3cljj-7R
DIY Redwood Planters  – Step 6.

Now you are ready to plant!  We planted blueberries so we could better control the soil since blueberries grow best in acid soil.

DIY Blueberry Planters via it's jou life - http://wp.me/p3cljj-7R
DIY Redwood Planters in the garden.

DIY: crafting handmade baby girl card

handmade baby girl card

handmade baby girl card

I recently handcrafted this baby card (almost) entirely from decorate scraps & materials I had lying around. I like to repurpose materials.

Materials: 1 – Colored card stock paper (a lighter color works the best)
1 – Patterned paper (for card borders or other accent blocks on envelope)
1 – Another color (to cut out geometric shapes)
2 – 6″ string (for the stringed look with letters)
2 – Decorative cut-outs or stickers (like the magenta button on the card, or the pin on the envelope)
Other miscellenous items: White liquid glue, tape, letter stamps (or colored markers)

Card:This is a postcard-type card (no bend or fold).

1.  Take the colored card stock paper and cut dimensions that are slightly smaller than the envelope. Tip: Use a lighter color card stock paper because it’s easier to read the written message.

2.  Framed border: Take scraps of patterned paper and measured the length and width of the card. Glue the strips to the edges of the card.

3.  Words: Cut out square and triangle shapes and used letter stamps. (Handwriting the letters with markers work just as well, if letter stamps aren’t present) Make sure the shapes cut will fit on the card.

4.  Stringed Look: I used 6″ of flat colored string . Before taping the ends behind the card, first place the string on the card to see where you like the letters to be placed.

5.  Stamp the letters or write the letters on the geometric shapes. Glue them into place on the card.  It’s ideal to first space them out to see the overall look before gluing.

6.  Accents: Use your creative instincts to glue the cut-outs or stickers on the card/envelope.

7.  Write your message!

Envelope:
It’s always a nice touch to craft my own envelopes. I use this Paper Source template for envelope ($15) and liners ($12.50). Possibilities are endless.

Welcome to It’s Jou Life !

couple wear

couple wear

{ Welcome to It’s Jou Life }

Hi! We’re Wayne and Jennifer, just two quirky people who found love in the most unexpecting place. This is our DIY / lifestyle blog–highlighting our smorgasbord of interests. Our friends always ask us how we grow our own organic vegetables, how did we make that cute zippered pouch, techniques for marathon training, what’s our recipe for zucchini bread, what to bring for a camping trip, what’s Jennifer’s favorite BB Cream brand? This is our way to share life’s loves.

Here’s a glimpse into our quirky lives.
~

Feel free to leave comments & suggestions, or even share this blog with others!